Monday, October 31, 2011

How To Treat Lice Cheaply & Chemical-Free

In honor of Halloween I decided to post about the scariest thing I could think of, head lice.  I think the only thing scarier than head lice are bed bugs since, as I hear it, there is no getting rid of those little boogers.  Fortunately, there are ways to treat head lice all of which can be done cheaply and without using chemicals if that is important to you.  Happy Halloween!

Suffice it to say that it has taken me a few weeks to get over the utter shame and humiliation of being a victim of a lice infestation to be able to actually write about my experiences.

It all began on a Monday morning in September when I received a text from Georgia Boy that said, "[Bonus Son] has been sent home from school for lice.  Check Superman."  At that exact moment I was at a MOPS (Mothers of Pre-Schoolers) meeting in the home of a friend where Superman and Sidekick were happily playing {in close proximity} with about 5 other unsuspecting children.  I let the full shame of the moment sink in before I grudgingly turned to my friends and told them about the text urging them to check their children when they got home.

When we got home I checked Superman and discovered that he had head lice too.

We were on full Head Lice Def Con 5 at our house.

I sent Georgia Boy to the store to pick up everything necessary for treating head lice and immediately called the pediatrician's office for information and help.  After talking to the pediatrician's office, reading information online, and the wisdom born of experience here is what I learned on how to treat head lice.


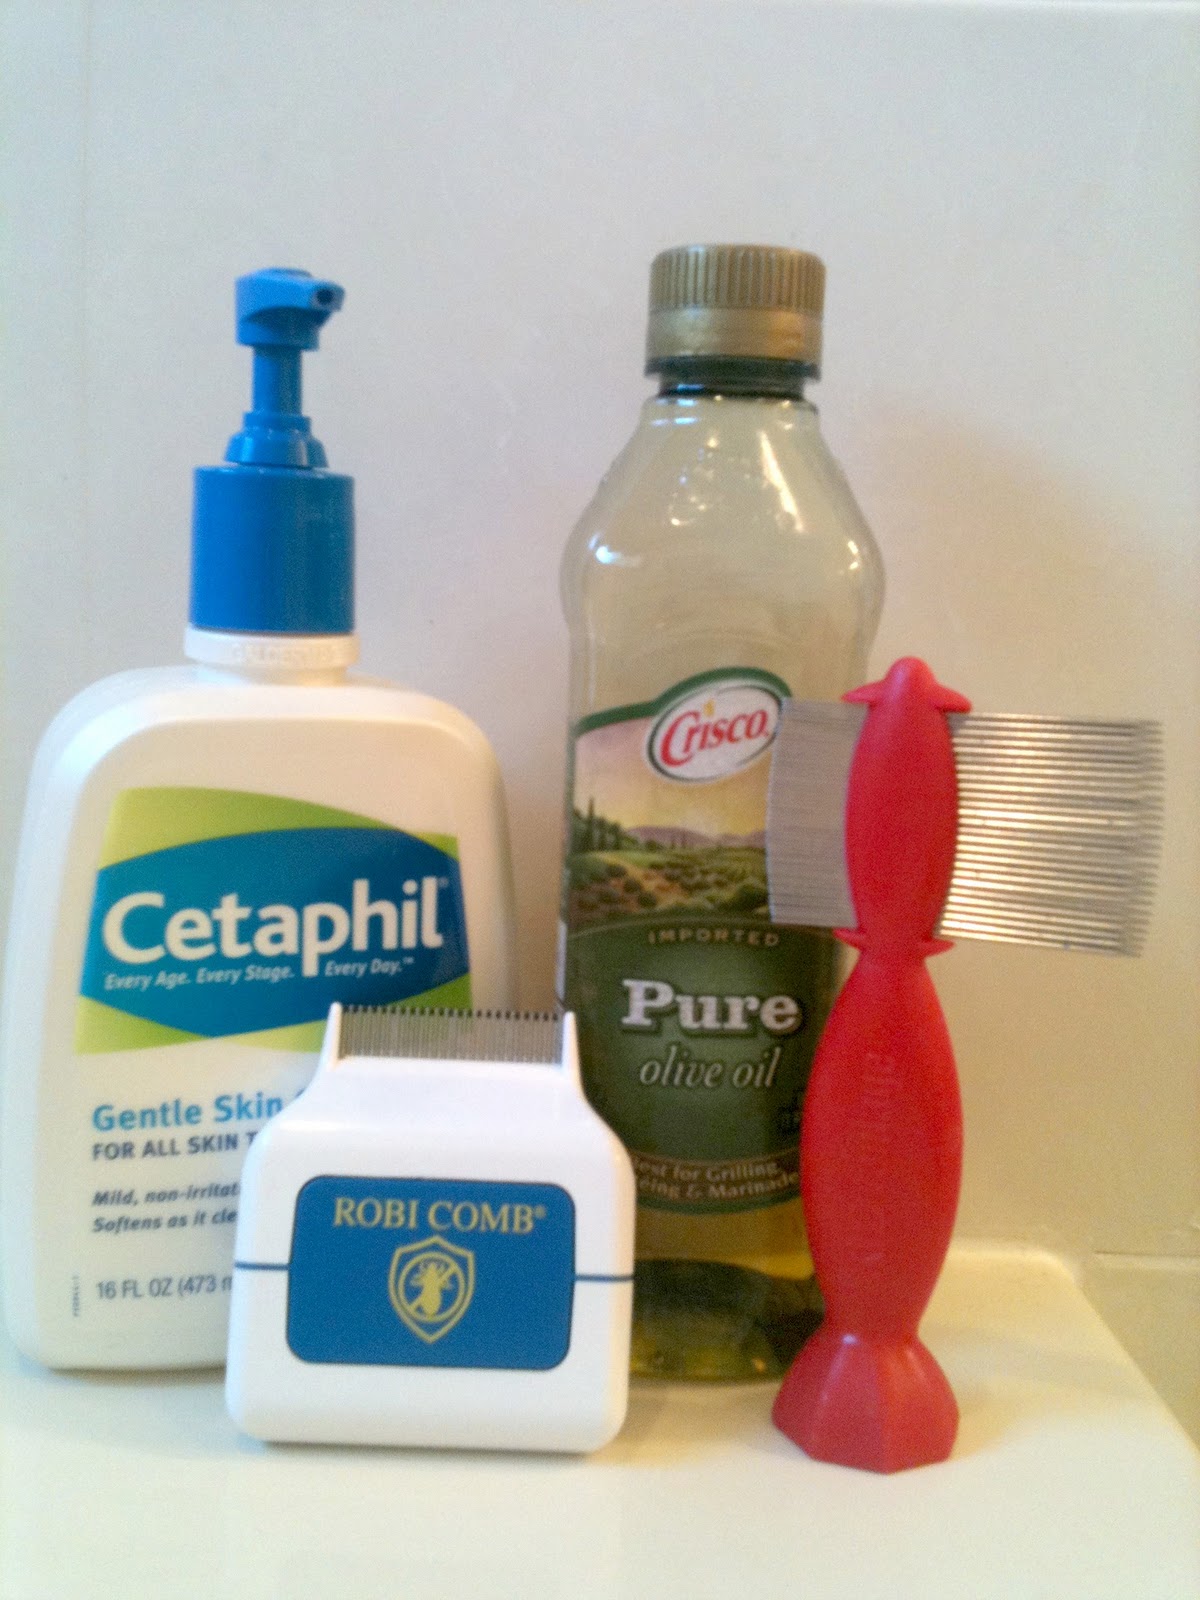
Hair - You will need 1) A head lice killer and 2) A nit comb.
RID and other chemical treatments are the most commonly used items to kill head lice.  However, you don't need to use these pesticides on your kids to effectively kill the head lice.  Head lice simply need to be smothered in order to be killed and then you can pick out the dead lie and any nits with a nit comb.  To smother head lice you can use Cetaphil face wash or olive oil.  I discovered from my peditrician's office that these remedies are as effective as any prescription remedy when used correctly.  


To use these remedies completely slather the child's head in Cetaphil face wash, let dry and wear for 8 hours and then wash out.  Do this one time a week for 3 weeks and the treatment is 96% effective.  I did this in the evening and allowed them to sleep all night with it in their hair.  Once the Cetaphil dries it isn't greasy so it didn't stain their pillowcases or bed sheets.  Another option is to use olive oil in the same manner and either wear it all day or sleep in a shower cap.  My kids were too young for this one so I used the Cetaphil on both of them and did the olive oil on me.  That's right, I rocked a greasy, shower-capped head.  Nothing like insult to injury.


Each day pick through your child's hair with a nit comb thoroughly and in good lighting.  The Cetaphil or olive oil will smother them but they key is continuing to be vigilant about checking for any new ones and removing the dead ones.  You will need to do this for a couple of weeks.  A regular nit comb will work well but when I sent Georgia Boy to the store I had forgotten what a complete bug-o-phobe he is and how he doesn't always stick to my *frugal* ways.  He came home with a $30 electronic nit comb called a ROBI comb.  It makes a humming sound when turned on and will beep when it detects any lie or nits.  It worked great but the directions say to use one per person and at $30 a pop is a bit steep for my taste.  If you're a huge bug-o-phobe like Georgia Boy it may be worth it to you to fork over the cash for a ROBI comb.  If not, a regular nit comb will do the trick.


Linens - Know that you will be doing a lot of laundry during these 2-3 weeks but stick with it and you'll be glad you did.  Begin treating your linens by washing and drying everything that you can.  This includes bed sheets (down to the mattress pads), pillowcases, slipcovers, blankets, stuffed animals, etc.  Anything that can't be washed and that you think may have come in contact with any head lice can be put into plastic bags and placed in a hot attic or garage for 3-4 weeks.  This will ensure that there is enough time for any live lie to die.  After the 3-4 weeks you can either wash everything or run them through the dryer to freshen them.  The good news is that head lice cannot live without a host so any that may have fallen on the floor or furniture are actually considered nonviable, dying or dead.  Without a host, the head lice will be dead within 48 hours.  This is good news because it means you don't have to go crazy trying to chemically treat your house or figure out a way to fit your sofa into your washing machine.  


I instituted a "no sitting on furniture" policy for 3 days and had the kids sit only on the floor.  I vacuumed once each day and continued to wash all linens, towels and clothes daily.  A friend of mine gave me a tip on the bed linens.  Instead of washing, making, and stripping the beds each day, I gave Superman a sleeping bag and pillow and had him sleep on his bare mattress.  This way I only had to wash the sleeping bag and pillow case each day.  After washing those items I would add the pillow to the drying cycle on high heat since our pillows weren't able to go in the washing machine.  


The key to treating head lice is consistency.  You don't need to spend a lot of money treating head lice and you don't need to buy any special kits or products.  Use the smother method to kill them initially and then stay vigilant through the entire life cycle of the nits to ensure that they are gone for good never to return!


Treat your children, wash all linens, bag anything made of fabric that you can't wash and comb through your child's hair with a nit comb several times a day.  Do all of this and you'll soon be rid of the little boogers and will wear your badge of honor proudly.  I survived Head Lice.  You will also have a new appreciation of the term "nit picker."


Happy bug killing, Cheap Mamas.

Thursday, October 27, 2011

A Little Bench and Chalk Paint

For some time I had been wanting a little bench to go in front of my fireplace.  A little seat that beckoned  me to come sit and warm myself by the fire.  I had seen a few in some of my favorite catalogs but of course, being the Cheap Mama that I am, knew that I would never pay full retail price.

So I just kept my eye out when I would go consignment shopping knowing that one day I would find one that fit my budget.

And one day, I did.


Hello, the 1980's called and they would like their fabric back.

I am only kidding.  I'm sure one day my children will look at pictures from their childhood and ask me why I painted everything white and made it look old.

I wanted to make this bench look really worn, not perfect at all.  I used Annie Sloan Chalk Paint in Old White and then did a coat of clear wax and dark wax which I rubbed into the wood in a circular motion with an old undershirt.  I recovered the seat in some scrap fabric that I had leftover from a previous project.


Every time I do another project with Annie Sloan's products I learn something new.  What I learned this time is that working on a piece with round legs can be tricky.  Because the legs weren't a flat surface I had to go slowly to make sure that the worn look didn't look too uniform and that it didn't get too heavy in places and not heavy enough in other places.  I also learned that to get this look it worked better to apply the dark wax in a side-to-side motion and then rub the wax into the paint in a circular motion instead of in the same direction in which I had applied the wax.  If I did that, then I ended up essentially wiping off the wax and erasing the effect I was going for.  By waxing in one direction and rubbing in a different direction, I got the old patina look that I wanted.

Did anyone else think of Karate Kid with all that talk about wax on, wax off?  No, just me?

Tell me what you think of my little bench project and leave any tips you've learned with Annie Sloan products.

Happy Waxing, Cheap Mamas!  (Not brow or bikini waxing.  That's another post for another time.)

Monday, October 24, 2011

Quick Bathroom Cleaning Tip

Several weeks ago I wrote about how I clean my house without a cleaning lady.  I basically break down my cleaning list into several daily manageable tasks that take about 20 minutes on average to complete.  I do this because 20 minutes is about all I can spare before one of the kids starts whining, crying, pooping or needs a snack.

I perform the same tasks each day of the week and the days that I dread most are Tuesdays and Thursdays. Why, you ask?  Because Tuesdays are dusting and Thursdays are bathrooms.  I finally figured out that the reason I loathe these days isn't the actual cleaning job itself but it's moving all of the STUFF out of my way so that I can actually clean.

Then I came up with a solution.

Here is my STUFF BASKET.


I simply took a tired plastic toy basket that wasn't being used and put it with all of my cleaning supplies.  I now use it as basket to hold all of the STUFF on the bathroom sink while I clean.  I love it because I can chuck everything into it FAST and then quickly unload it when I'm finished cleaning.

Does everything get put back in its proper place immediately?  Usually, no.  I unload it as quickly as I can and save the rearranging for the evening when I'm bathing the kids and washing my face/brushing my teeth.  The perfectionist in me would love for everything to be in its proper place immediately but the realist in me knows I'm on a clock before the baby starts whining so it's git 'r done and git on out.

I also use the STUFF BASKET when I dust and as a "take it upstairs" or "take it downstairs" basket for all of those things that seem to accumulate in the wrong place.  It's not rocket science but it really has helped make these jobs easier to complete in a short amount of time.

Here's to a clean bathroom, Cheap Mamas!  Or, at least until the kids spit out their toothpaste globs.

Friday, October 21, 2011

Fall Scents For Less

One of my favorite things about fall is all of the wonderful scented candles that come with the season.  I love all of the warm and cozy scents like gingerbread, pumpkin, vanilla and others but I don't like paying a lot to enjoy those scents.

In my pre-Cheap Mama days I used to plop down a lot of money for candles and scented oils to make my home smell great but when you're on a budget those expensive candles just aren't on the priority list.

This is why I was pleasantly surprised to find that the line of Better Homes & Gardens fall candles at Wal-Mart not only has a line of great scents but the quality is also there as well.  These candles and accessories fill my house with warm fall scents just as good as the expensive ones did.

The candles are priced just under $5 and there are also bricks of scented wax cubes that can be used in a tea-candle diffuser priced at $2 each.

$2 gets you 6 cubes that you break off and use one at a time.  The great part is that they aren't a one-time use.  I have used the missing cube for several uses.  The wax will re-melt with each use and I keep using it until I think that the scent is waning.


Below is a candle and a cube in a diffuser which I purchased eons ago from Bath & Body Works.  I added some small pumpkins and pine cones from my yard for a fall arrangement.


All of these can be found in the seasonal aisles at Wal-Mart so they probably won't be around forever.  So if fall candles are in your budget, get them while the gettin's good as they say!

Here's to enjoying the scents of fall, Cheap Mamas!

Wednesday, October 19, 2011

Antique Tool Caddy Turned Desk Accessory

This week Donna of Funky Junk Interiors presented her readers with a challenge.  The challenge was to choose an object in our home and to think outside the box.  To find a different way to use that item instead of the original purpose for which it was intended.

When she issued this challenge I had just finished claiming our back-door-desk-junk-holder into my own official desk and was having fun adding items to make the space mine all mine.

I also had an antique tool caddy that I had snatched up at the Habitat store which I had intended to use for floral arrangements.


Isn't it so cute?  When I bought it I had imagined all sorts of floral arrangements for each season.  However, every time I tried to find a place for it in my kitchen or living room I could never find the right spot.  It was either too small or too big for every space I tried.  Thus, it was left sad and lonely in the laundry room while I tried to find another use for it.

Enter the Funky Junk challenge.

As I carried the tool caddy around my house I had an epiphany.  (Or I may have had the epiphany while I was lying in bed at night thinking about my house projects instead of sleeping, which I tend to often do.)  What if I used it for my desk to store pens, sticky note pads, and other Cheap Mama desk items?


And a desk organizer was born!  I love it here.  (I'm actually sitting at the desk right now typing this post).  It brings my style in a small way to my desk and actually serves a useful purpose instead of merely a decorative one.

If you, like me, are interested in turning trash to treasure, blogging, home decorating and spending time with a great lady please visit Donna at Funky Junk Interiors.

Monday, October 17, 2011

Seven Years of Good Luck

This past weekend Georgia Boy and I celebrated 7 years of marriage.  The success of our marriage has actually had nothing to do with luck and everything to do with the grace and guidance of God.  When Georgia Boy and I married we created a blended family with the two of us and my Bonus Son Cole who was 4 years old at the time.  As anyone who is in a blended family can attest, the road is difficult and full of struggles.  But we knew that God had put us together for a reason and we were determined to create something beautiful with our new family.

Two years into our marriage we were blessed with the birth of Superman and four years after that we were again blessed when we added our precious Sidekick to our family.  After seven years of living, loving and creating shared memories we have built a family that is as wonderful and flawed as any family.  I am blown away with what we've been given and look forward with anticipation to the memories that are still to be created.

In a perfect world Georgia Boy and I would have celebrated by dropping the kiddies off with a set of grandparents and heading to New Orleans for a couple of kid-free days to enjoy everything that our city has to offer.  However, since we're approximately a 12 hour drive from any set of grandparents and BOTH babysitters were busy, we went out to eat with the kids and gave each other a high-five at seven years of hard work...and God's grace.


At a 2010 LSU/UGA baseball game in Baton Rouge.  You can't see it but I'm 7 months pregnant with Sidekick.


At the happiest place on Earth.  As you can see, I'm wearing my Cheap Mama uniform.  Oh how I love the zip-up hoodie.


The night of Bonus Son's guitar recital.  Yes, that is a boa poof bow on Sidekick's head.


Here's to 7 more years of God's grace and provision.  And 7 more after that.  And 7 more after that.  Well, you get the picture.  


Friday, October 14, 2011

How to Potty Train Without Pull-Ups

I have nothing against Pull-Ups or anyone who uses them.  I use the brand name here as a general term for all training diapers because it is the one with which we are all most familiar.

When it came time for me to potty train Superman he was 3 years old and not showing the slightest interest in the subject.  I had been waiting for him to show interest - like the books tell you to do - but he was as content as a pig in mud to keep pooping in a diaper.  However, this Cheap Mama was sick and tired of changing those diapers and so I determined that the month he turned 3 years old we would begin potty training.

See, completely adorable with his bubble beard but absolutely no interest in the potty.


I also knew that after changing about a zillion diapers over three years I didn't want to spend the next year changing poopy Pull-Ups.  I decided to go old school and potty train cold turkey.  No diapers.  No Pull-Ups.  Just a boy and a toilet.  I wanted to do it to save both money and time in the potty training process.

I began by scouring the internet to see what tips I could find on the subject and came across a website that I used with complete success.  It's called the 3 Day Potty Training method and it's the brainchild of a woman named Lora Jensen.  I have absolutely no affiliations with Ms. Jensen other than the fact that I used her method and would highly recommend it to anyone beginning to potty train.  It is very positive for the children, encouraging for the mothers and offers online help.  I realize that there are probably other methods out there that work well also.  The bottom line (get it - bottom line?) is you don't have to spend a year using Pull-Ups while trying to potty train your child.

Now as a disclaimer, we did have the normal setbacks associated with potty training such as little accidents here and there and an occasional poopy pair of underwear, but I can tell you that we never once had to use a training diaper.  I may have had to replace some of those poopy pairs of underwear but the savings of never having to buy a single pack of Pull-Ups greatly outweighed any extra money I had to spend on underwear.  One word on buying underwear - don't get sucked into buying your kids the expensive character underwear unless you're using them as a prize in the potty training process!

Hopefully this will help you become a potty training Cheap Mama and save on your bottom line too.  Sorry, had to get that pun in there just one more time!

Good luck Cheap Mamas!

Thursday, October 13, 2011

Hot/Cold Faucet Trick for Kids

When my son got tall enough to reach the faucet in the sink I was thrilled because this meant he was gaining some independence and could wash his own hands without me hoisting him up to the sink.  Woohoo!  It also meant that I was worried about him scalding himself with the hot water.  Because he couldn't read yet, I knew it would have to be a simple way for him to remember which side was hot and which was cold.

I decided to use rubber bands on the faucet handles; red for hot and blue for cold.  After that he never had a problem remembering which one to use!


Hopefully that will be a little trick you can use for your own kiddos!  Thanks for reading, Cheap Mamas!

Wednesday, October 12, 2011

Great OPI Nail Polish Knock-Off

Warning:  I am not a hand model.  Or a manicurist.  You'll see why below!

As fall rolls around I begin to pull out some of my favorite dark nail polish colors.  One of those favorites is the OPI color You Don't Know Jacques.  It is a wonderful matte greige and I wear it practically throughout both the fall and winter seasons.  I didn't know what 'greige' was until I read a fashion magazine and discovered that this was the new moniker given to this gray/beige color.  I love it because it goes with almost any dark color throughout the season but it doesn't make me look like I'm trying to look like a teenager.

OPI nail polishes have been one of those little happy items that I would occasionally treat myself with as a little reward for all that I do to scrimp and save.  However, even just occasionally purchasing these items was still difficult.  It just seemed a little steep to pay $8-$9 for a bottle of nail polish.

As luck would have it, though, this week I stumbled upon an exact replica of You Don't Know Jacques completely by accident with a price tag of only $2!  I was passing the time in Walgreen's while my son was in his karate class when I found the color Nirvana by Sinful Colors Professional.  I brought it home to compare and here are the results.  I painted one hand with each and you can see for yourself below - you can't tell the difference!

Now, I love my OPI colors as much as the next girl but if you're in need of a great 'greige' for fall and winter I think you'll like Nirvana.

In the bottle...


On the hand...


I told you I'm not a hand model.  Where's George Costanza when you need him?

Happy nail painting, Cheap Mamas!

Monday, October 10, 2011

Bulletin Board Bow Organizer

Having a little girl is like having an accessories explosion inside your house.  My first child was a boy and to clothe a boy you need 4 things: shirt, pants, shoes, socks.  Sometimes you don't even need the socks.

When clothing a girl the number of necessary items grows exponentially.  One of those necessary items is, of course, the BOW.  What little girl would be complete without donning a bow approximately the same size as her head?

As Sidekick grew, so did our bow collection and I knew I needed some way to keep them organized.  I had seen bow organizers in our local boutique stores but the Cheap Mama in me just couldn't quite bring myself to fork over the money for one of them.  The one day: LIGHTBULB!  I decided to use a criss-cross ribbon bulletin board that I already had as her bow organizer.

This is all about using what you have so I would never say you need to run out and buy one but if you have one lying around the house, use it!  Ours is hung inside her closet so if the one you have doesn't match the room's decor, it won't matter because no one will see it but you!


Have a blessed week Cheap Mamas!
Related Posts Plugin for WordPress, Blogger...